My writing/blog/whatever-you-want-to-call-it
My writing/blog/whatever-you-want-to-call-it
This is the first article in a series on use cases for Open Policy Agent in Istio Ambient Mesh. The series will cover using OPA as an External Authorization service, suggested deployment modes, and optimal architecture for reliability and scalability. We will also discuss using OPA for resource validation and control around Istio features.
As I've previous discussed, I'm really excited about Istio Ambient Mesh. It's an obvious step forward for the service mesh, and I'm committed to helping people understand how they can leverage Ambient to accomplish their goals. I think there's a dearth of content on usage patterns and tutorials specifically for Ambient, and I'm hoping to help fill that gap.
This article will cover how to set up Open Policy Agent (OPA) as an External Authorization service in Istio Ambient Mesh. Authorization is a critical part of any security model, and OPA is a powerful tool for implementing fine-grained access control policies. By using OPA as an External Authorization service, you can enforce policies that are more complex than what Istio's built-in authorization policies can handle.
OPA has a plugin model that allows you to layer additional functionality on top of the base policy engine. This is a complex usecase, but luckily for us, the OPA community already created and maintains a version of the OPA engine that implements the Envoy External Authorization API. This means that you can use OPA as an External Authorization service in Istio Ambient Mesh without having to write any custom code.
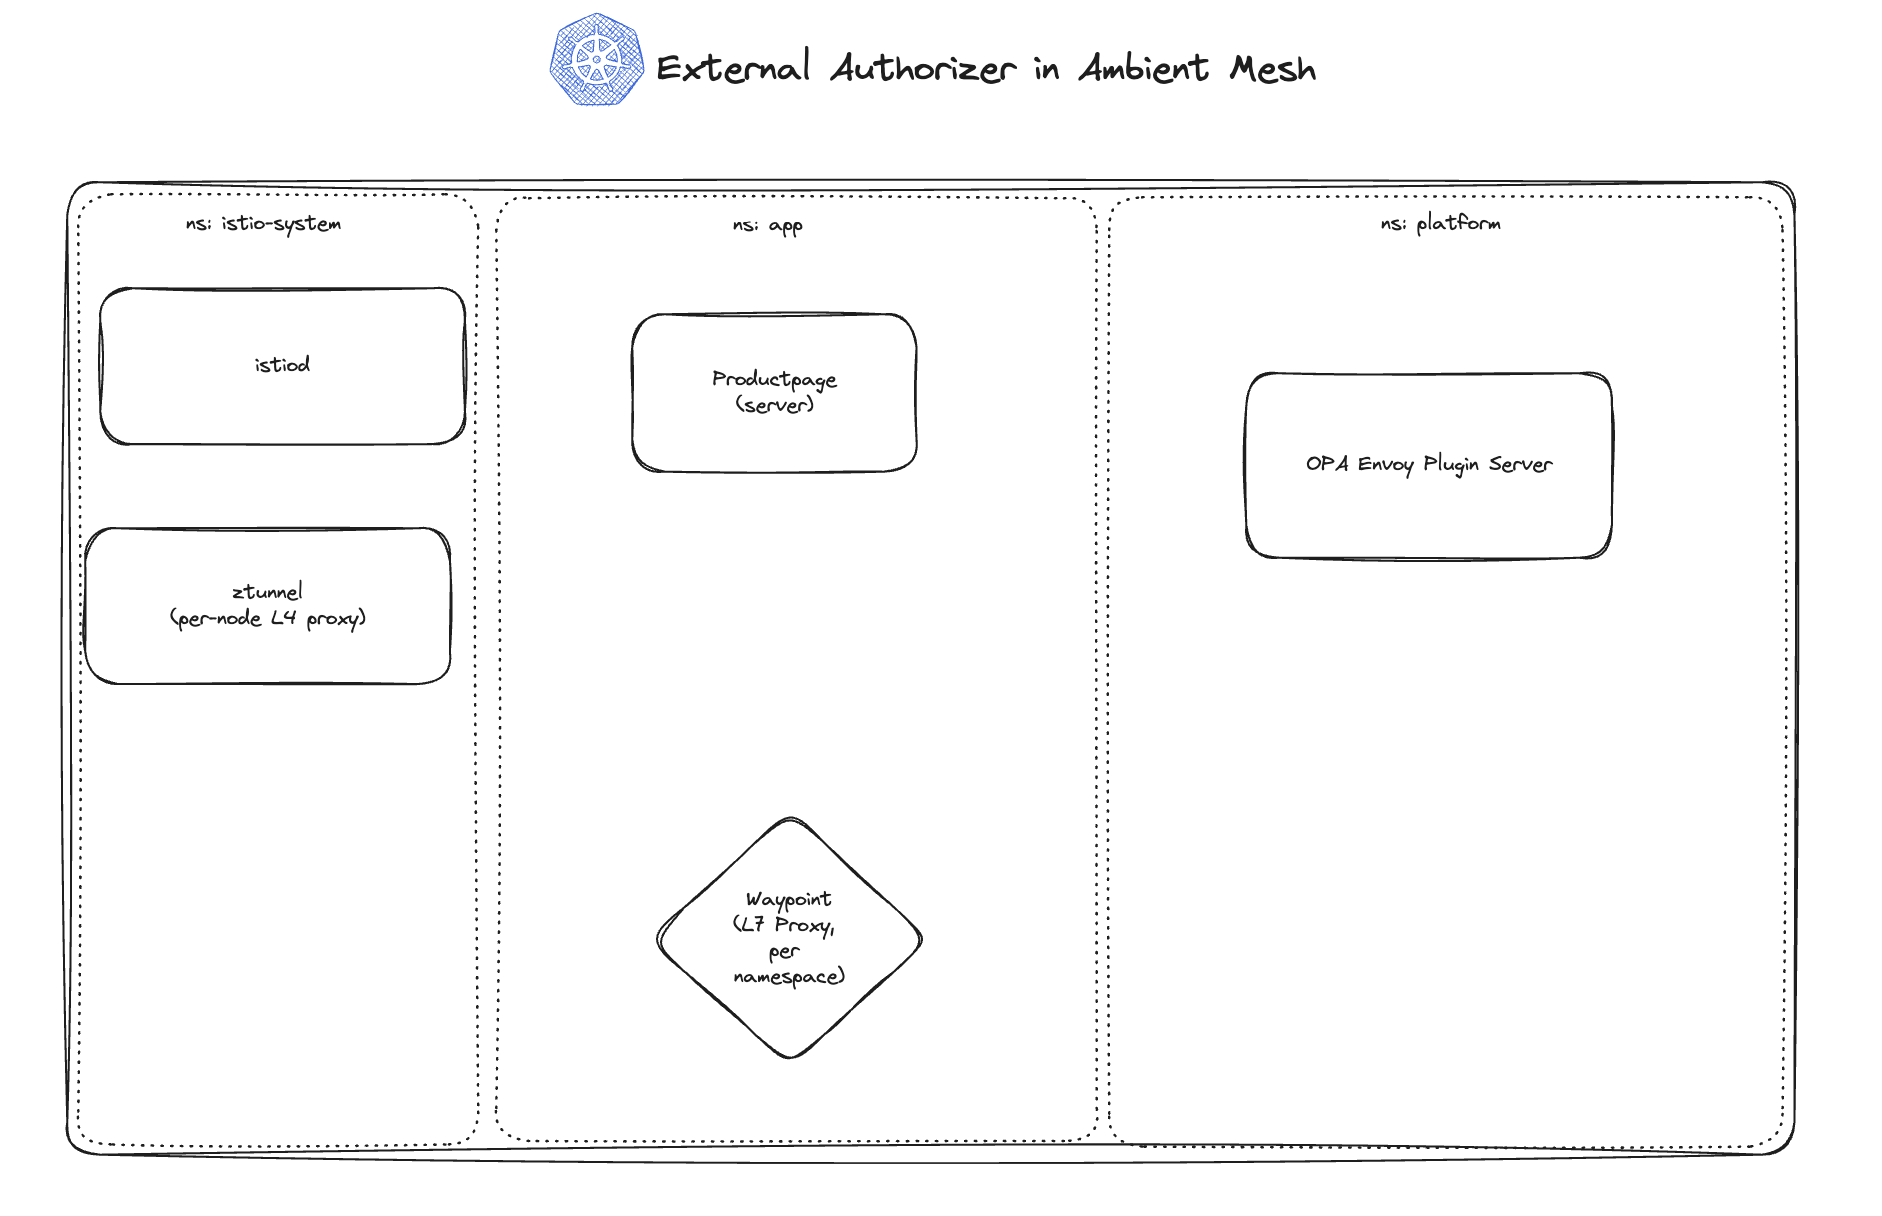
In the above diagram, you can see a diagram of the resources in our cluster. We have three namespaces: the default istio-system namespace, where the Istio Control Plane (istiod) and the ztunnel proxy run; the app namespace, where I've installed sample applications; and finally, the platform namespace, where OPA will run and other cluster-level platform components could live. In this example, we're going to deploy OPA as a single deployment. I'll cover using OPA as a daemonset in a future article.
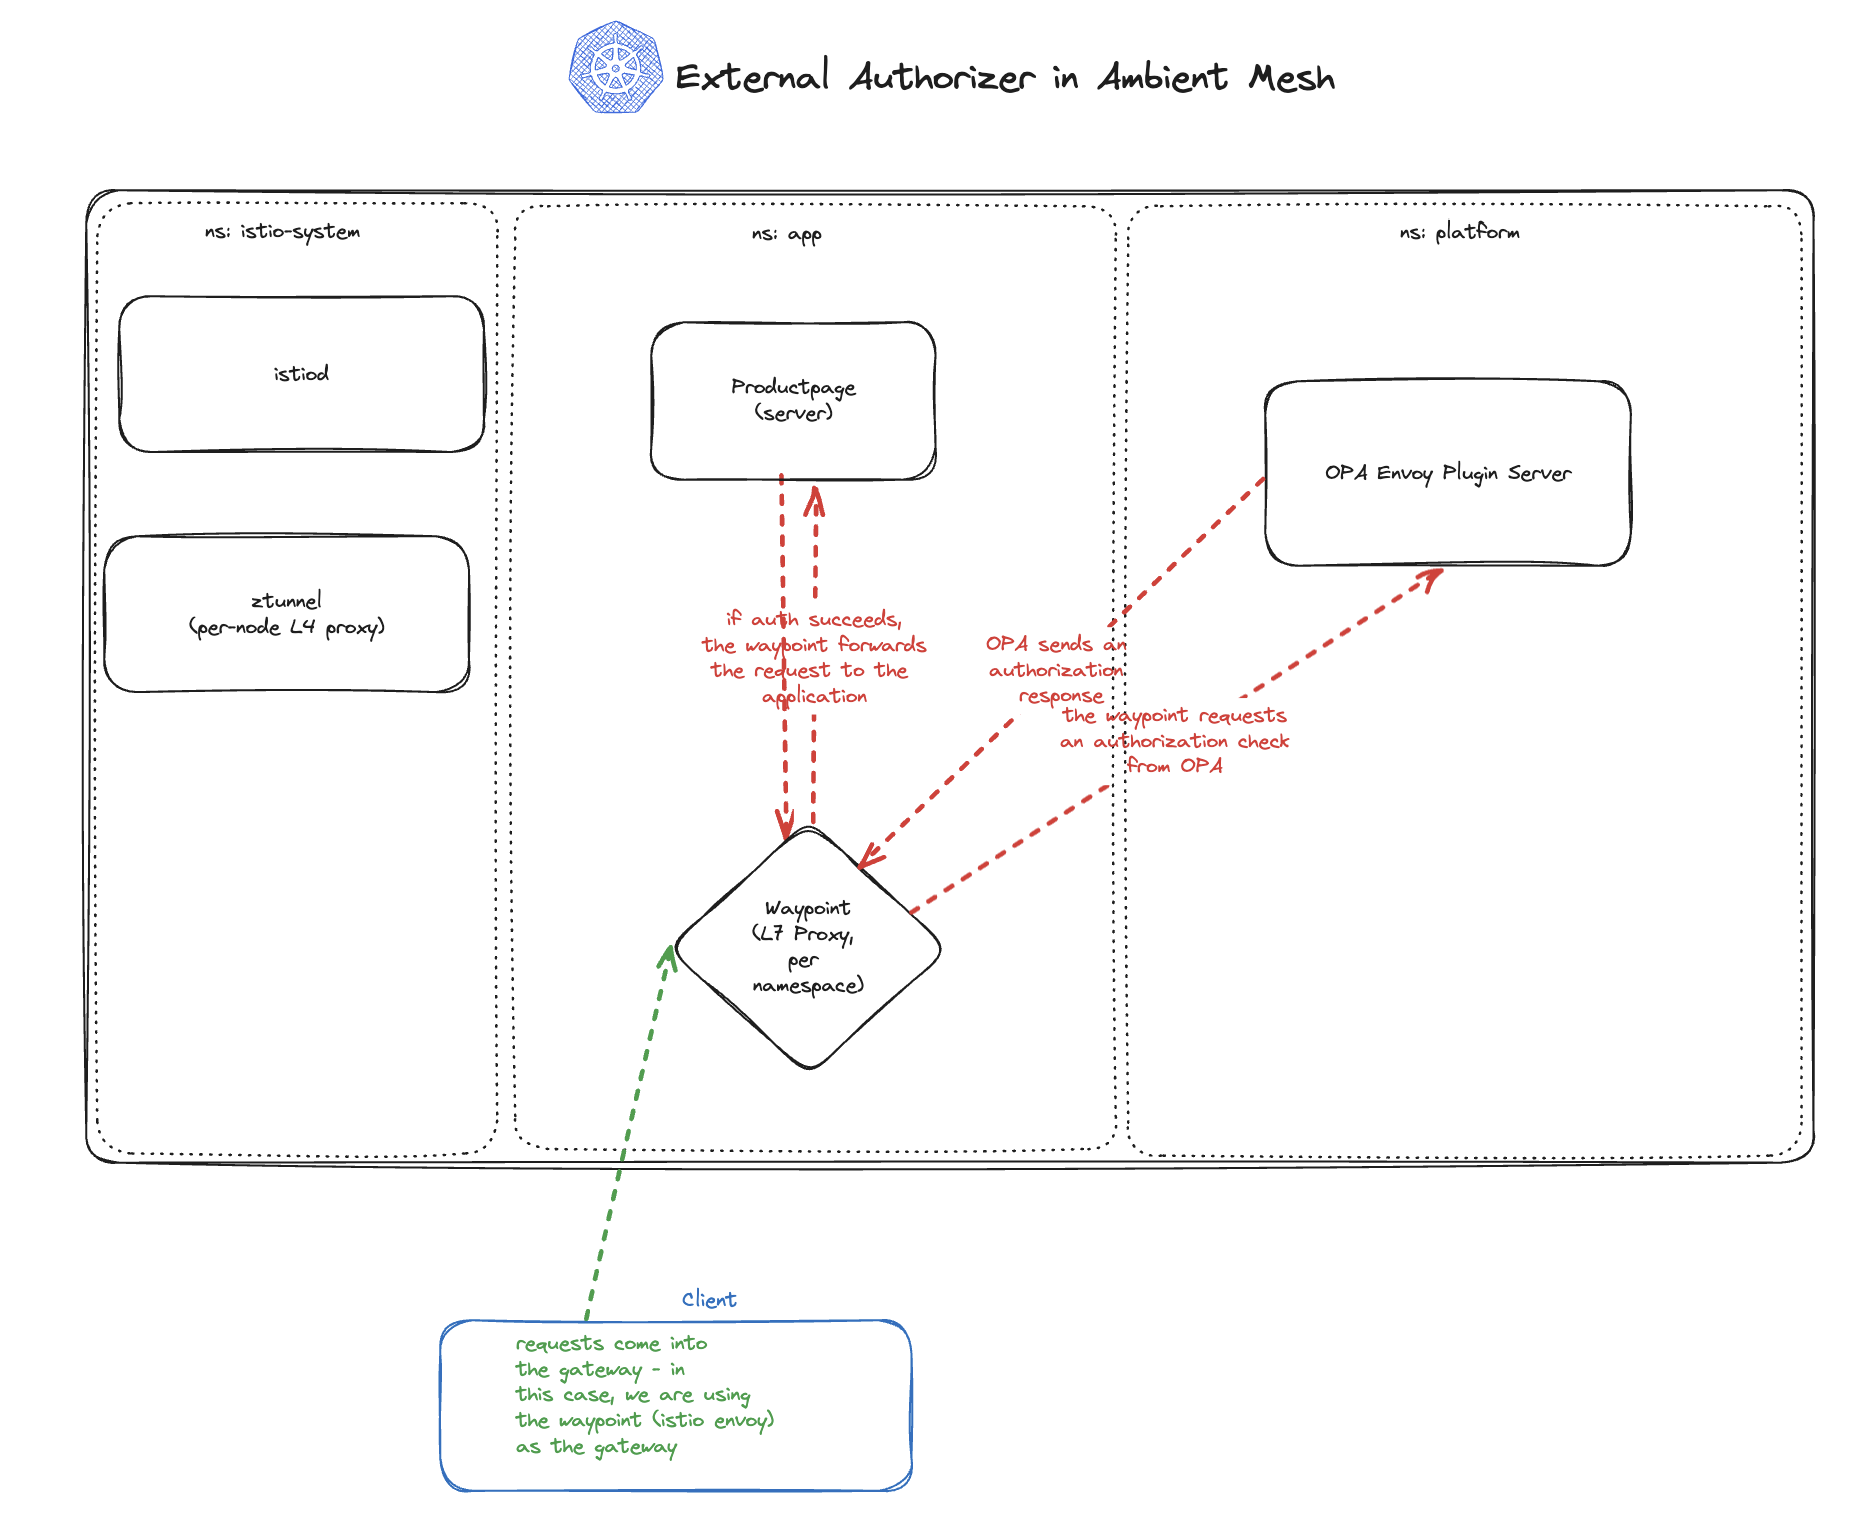
The above diagram shows the same cluster as the previous diagram, but with traffic flowing through the system. In this tutorial, we'll be sending traffic to the Waypoint proxy in the app namespace, which will perform an Authorization check against the OPA service in the platform namespace. The OPA service will return a decision to the Waypoint proxy, which will either allow or deny the request based on the policy defined in the OPA service. If the request will be allowed, the Waypoint proxy will forward the request to the destination service in the app namespace. Otherwise, the Waypoint will return a 403 Forbidden response to the client.
To start this tutorial, let's set up the cluster and install Istio using the ambient profile, along with the Kubernetes Gateway APIs.
# Create the cluster
kind create cluster --name istio-opa

# Install Istio with the ambient profile
istioctl install --set profile=ambient --skip-confirmation

# Install gateway-api CRDs
kubectl get crd gateways.gateway.networking.k8s.io &> /dev/null || \
    { kubectl apply -f https://github.com/kubernetes-sigs/gateway-api/releases/download/v1.1.0/standard-install.yaml; }
Next, let's create the app namespace, where we will install Istio's bookinfo sample app suite. We'll also install a sleep pod, which is another commonly used Istio sample app that comes with a curl client. This will be handy for in-cluster testing later.
                # Create a namespace for the bookinfo application

                kubectl create namespace app


                # Install bookinfo applications

                kubectl apply -n app -f https://raw.githubusercontent.com/istio/istio/release-1.23/samples/bookinfo/platform/kube/bookinfo.yaml

                kubectl apply -n app -f https://raw.githubusercontent.com/istio/istio/release-1.23/samples/bookinfo/platform/kube/bookinfo-versions.yaml


                # Install sleep application to test in-cluster requests

                kubectl apply -n app -f https://raw.githubusercontent.com/istio/istio/release-1.23/samples/sleep/sleep.yaml
There are a few more tasks we need to complete for cluster setup. We need a waypoint proxy to use as our gateway for cluster ingress, and label our namespace to use the ambient dataplane mode, adding our sample apps to the mesh.
# Create a gateway for the productpage app
kubectl apply -n app -f https://raw.githubusercontent.com/istio/istio/release-1.23/samples/bookinfo/gateway-api/bookinfo-gateway.yaml
istioctl waypoint apply -n app --enroll-namespace --wait

# Annotate the namespace to use cluster IP
kubectl annotate gateway bookinfo-gateway networking.istio.io/service-type=ClusterIP --namespace=app

# Label the namespace to use the ambient dataplane mode, adding the workloads in the namespace to the mesh
kubectl label namespace app istio.io/dataplane-mode=ambient
We're almost there! Now, we need to create a namespace for our OPA server to reside in. Let's call that namespace platform, matching the diagram we discussed earlier.
kubectl create namespace platform
Let's recap what we did. We set up a kind cluster, and installed Istio using the Ambient mode, enabling Ambient Mesh in the Kind cluster. We then installed sample apps to use for testing in the app namespace, and added that to the mesh, including a waypoint proxy. Now, we're ready to start building our our platform namespace with Open Policy Agent and configuring Istio to use OPA as the external authorizer.
To deploy OPA, we need a few different resources. I'll break them down one by one and then we can apply then in one command.
First, we need a Deployment resource to run the OPA pod.
kubectl apply -f - <<EOF
apiVersion: apps/v1
kind: Deployment
metadata:
  name: opa-istio
  namespace: platform
spec:
  replicas: 1
  selector:
    matchLabels:
      app: opa-istio
  template:
    metadata:
      labels:
        app: opa-istio
    spec:
      containers:
      - name: opa-istio
        imagePullPolicy: IfNotPresent
        ports:
        - containerPort: 9191
          protocol: TCP
        - containerPort: 8282
          protocol: TCP
        - containerPort: 8181
          protocol: TCP
        image: openpolicyagent/opa:0.68.0-istio-4-static
        args:
        - "run"
        - "--server"
        - "--addr=0.0.0.0:8181"
        - "--config-file=/config/config.yaml"
        - "--diagnostic-addr=0.0.0.0:8282"
        - "/policy/policy.rego"
        volumeMounts:
        - name: opa-istio-config
          mountPath: /config
        - name: opa-policy
          mountPath: /policy
        livenessProbe:
          httpGet:
            path: /health?plugins
            port: 8282
        readinessProbe:
          httpGet:
            path: /health?plugins
            port: 8282
      volumes:
      - name: opa-istio-config
        configMap:
          name: opa-istio-config
      - name: opa-policy
        configMap:
          name: opa-policy
EOF
This is a pretty standard Kubernetes Deployment object. We're running the openpolicyagent/opa:0.68.0-istio-4-static image, which is a recent release of the OPA-Envoy-Plugin. The -istio and -envoy image varients are actually identical. The deployment will run OPA listening on port 8181 with the diagnostic port of 8282. OPA uses the diagnostic address for healthchecks, which we've defined for Kubernetes here.
We're going to define two configmaps later, and they'll be mounted as volumes into the Deployment and used to configure the OPA server and the Rego Policy, respectively.
An astute reader will notice that in the deployment above, I actually defined a 9191 port as well. What's that port for?
This brings us to the first configmap we will define:
kubectl apply -f - <<EOF
apiVersion: v1
kind: ConfigMap
metadata:
  name: opa-istio-config
  namespace: platform
data:
  config.yaml: |
    plugins:
      envoy_ext_authz_grpc:
        addr: 0.0.0.0:9191
        path: istio/authz/allow
    decision_logs:
      console: true
EOF
This ConfigMap is responsible for configuring the OPA server at runtime. It turns on decision logging to the console (STDOUT), which will be helpful when we want to debug later on. Then, it enables the envoy_ext_authz_grpc plugin, which is the actual plugin to Open Policy Agent that implements the Envoy ExternalAuthorizer API. The configuration here instructs the plugin to listen on that 9191 port we defined on the container here, and to direct requests to the istio/authz/allow rule.
For our second ConfigMap, we need to provide OPA with the policy we're looking to enforce. I'm going to reuse the rego policy from the OPA Istio tutorial. Take a look at it here:
kubectl apply -f - <<EOF
apiVersion: v1
kind: ConfigMap
metadata:
  name: opa-policy
  namespace: platform
data:
  policy.rego: |
    package istio.authz

    import input.attributes.request.http as http_request
    import input.parsed_path

    default allow = false

    allow {
        roles_for_user[r]
        required_roles[r]
    }

    roles_for_user[r] {
        r := user_roles[user_name][_]
    }

    required_roles[r] {
        perm := role_perms[r][_]
        perm.method = http_request.method
        perm.path = http_request.path
    }

    user_name = parsed {
        [_, encoded] := split(http_request.headers.authorization, " ")
        [parsed, _] := split(base64url.decode(encoded), ":")
    }

    user_roles = {
        "alice": ["guest"],
        "bob": ["admin"]
    }

    role_perms = {
        "guest": [
            {"method": "GET",  "path": "/productpage"},
        ],
        "admin": [
            {"method": "GET",  "path": "/productpage"},
            {"method": "GET",  "path": "/api/v1/products"},
        ],
    }
EOF
If you're familar with the Rego Policy Language and its syntax, this is a pretty simple Rego policy. If not, you probably think this is some form of occult incantation. Fear not - the Rego Docs are here to help. Covering the intracicies of Rego is outside the scope of this article, so I'll briefly summarize it.
This policy defines a set of rules that reside in the istio.authz package. The policy denies all requests by default, allowing GET requests to the /health endpoint. The policy then defines two users, Alice and Bob. Alice is the guest user, and Bob is the admin user. The policy will allow guests to send HTTP GET requests to the /productpage endpoint, and will allow admins to send HTTP GET requests to both the /productpage and /api/v1/products endpoints.
With a Rego policy defined, all that's left is a Kubernetes Service object to allow requests to the OPA server.
kubectl apply -f - <<EOF
apiVersion: v1
kind: Service
metadata:
  name: opa-istio
  namespace: platform
spec:
  ports:
  - name: grpc
    protocol: TCP
    port: 9191
    targetPort: 9191
  selector:
    app: opa-istio
EOF
There are two more Istio-specific tasks we need to complete before this tutorial is ready for testing. First, we need to register the OPA server as an extensionProvider in our Istio MeshConfig ConfigMap. This is one of the key differences when using OPA in Istio Ambient vs. using OPA with sidecars. In sidecar deployment mode, each application pod receives an additional OPA sidecar that is injected and the envoy proxy sidecar uses the local OPA sidecar for authorization. Since there are no sidecars in Ambient mode, it makes more sense to deploy one (or multiple... we'll discuss in a future article) instance of OPA to use as the authorizer globally, as we've done here.
If you've been following along and installed Ambient mode with the commands I provided, you'll want to edit the istio ConfigMap in the istio-system namespace, and edit the mesh value to add the extensionProviders block below:
apiVersion: v1
kind: ConfigMap
metadata:
  name: istio
  namespace: istio-system
data:
  mesh: |-
    # ADD THESE LINES
    extensionProviders:
    - name: opa-ext-authz-grpc
      envoyExtAuthzGrpc:
        service: opa-istio.platform.svc.cluster.local
        port: 9191
    # END ADDITIONS
    defaultConfig:
      discoveryAddress: istiod.istio-system.svc:15012
      image:
        imageType: distroless
      proxyMetadata:
        ISTIO_META_ENABLE_HBONE: "true"
    defaultProviders:
      metrics:
      - prometheus
    enablePrometheusMerge: true
    rootNamespace: istio-system
    trustDomain: cluster.local
  meshNetworks: 'networks: {}'
Finally, we get to the fun part: testing our apps before and after adding authentication. Since we're using
kind here, let's port-forward our waypoint's port to the local machine, so we
can send requests to the waypoint.
kubectl port-forward -n app svc/bookinfo-gateway-istio 8080:80
Next, let's send some sample traffic as Alice and Bob, respectively:
curl --user alice:password -vik http://localhost:8080/api/v1/products
curl --user alice:password -vik http://localhost:8080/productpage
curl --user bob:password -vik http://localhost:8080/api/v1/products
curl --user bob:password -vik http://localhost:8080/productpage
All four of these requests should succeed. While we have configured all the necessary resources for OPA to serve as the external authorizer for the Waypoint, we haven't actually applied an Istio AuthorizationPolicy to tell Istio to use the OPA server as an authorizer. Let's do that now:
kubectl apply -f - <<EOF
apiVersion: security.istio.io/v1
kind: AuthorizationPolicy
metadata:
  name: ext-authz
  namespace: app
spec:
  action: CUSTOM
  provider:
    name: opa-ext-authz-grpc
  rules:
  - to:
    - operation:
        paths: ["*"]
EOF
This AuthorizationPolicy selects the opa-ext-authz-grpc provider as the external authorizer, which you'll notice matches
what we defined in the istio system-side ConfigMap. It applies authorization via the OPA server to all requests through this
waypoint. Now that we've applied the AuthorizationPolicy, let's run traffic through again and validate what we expect:
curl --user alice:password -vik http://localhost:8080/api/v1/products # This should fail with a 403
curl --user alice:password -vik http://localhost:8080/productpage # This should succeed with an HTML response
curl --user bob:password -vik http://localhost:8080/api/v1/products # This should succeed with a JSON response
curl --user bob:password -vik http://localhost:8080/productpage # This should succeed with an HTML response
If you've made it this far, congratulations! Hopefully this tutorial helps you see how easy it is to set up Ambient Mesh with Open Policy Agent as an external authorizer. It's arguably easier than using OPA in sidecar mode, and certainly more resource-effecient. Next time, we'll discuss best practices for using OPA as an authorizer with Waypoint proxies in Ambient mode, including deployment topology, scaling and testing.